Inside A Prosthetic Makeup Artist’s Toolkit
Tuesday, May 28, 2019
Some of our favourite makeup looks from film and TV include the art of prosthetics.
But we don’t often get to see the hard work and technical expertise that goes on behind-the-scenes when creating characters for the big screen.
Aside from a complex application process, a huge part of prosthetics makeup involves the creation of the prosthetics themselves. And this means getting to grips with the specialist tools and materials makeup artists use to create prosthetics looks.
So, here’s a run-down on the kit essentials that any aspiring prosthetics artist should know about.
What is prosthetics makeup?
Prosthetics is the process of life casting, sculpting and moulding to create a makeup look that totally transforms the actor.
It can often be confused with special FX makeup, but prosthetics is pieces that are glued on to the actor, while Special FX makeup is painted/sculpted directly on to the skin using various products.
Common types of prosthetic makeup
Generally, there are three types of materials used in prosthetic makeup. They include:
Gelatine – A material with a flesh-like consistency. This is sometimes used for smaller pieces because it’s quite heavy. One recent example of gelatine prosthetic is the nose piece worn by Rami Malek in Bohemian Rhapsody.
Foam latex – Known as the ‘old boy of prosthetics.’ One of the first examples of this type of prosthetic makeup in film is in ‘The Wizard of Oz’ applied to achieve the cowardly lion look.
Larger pieces like masks can often be made from foam latex because it’s lightweight, although it’s hard for it to be ‘brought to life’ and the edges do not dissolve.
Silicone – Probably the most common material used for prosthetic makeup is silicone. It’s durable and moulded pieces can be as thin as a few layers of skin, so the results are very life-like. One example is the iconic Joker look in ‘The Dark Knight’ which was created using stamped silicone pieces.

Examples of prosthetic makeup in Churchill (Photo credit: Universal Pictures UK/YouTube) and It Chapter Two (Photo credit: Warner Bros. Pictures)
How are prosthetics made?
While the results can be amazing, prosthetics makeup is technically complex. And the tools and products makeup artists use to create prosthetics makeup looks might seem more at home in a science classroom than a makeup set.
We asked Iver Makeup Academy tutor and hair and makeup artist, Renata Gilbert, to talk us through some of the essential items in her toolkit.
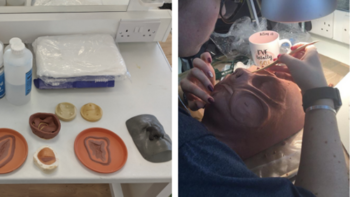
Step One: Sculpting
Prosthetic artists will have a life cast of the actor to sculpt prosthetic pieces on top of. Renata tells us that Chavant clay is commonly used: “when you take a cast of an actor you end up with a negative of their facial features, so you then have to fill it with plaster to get a positive replica which you can then sculpt on top of using a sculpting clay.”
Renata explains: “The clay can also be used to make flat moulds for details like cuts and scars.”
“From the sculpt, you can create the mould to fill for your prosthetic piece, with a few other stages in-between.”
Left: Flat moulds with Chavant clay, Right: Chavant clay sculpted on a face cast
Step Two: Moulding
Typically, silicone is used to create prosthetic makeup and Renata explains that this is done with PlatSil Gel.
“PlatSil Gel comes in two parts, A and B. We mix these with Deadener to make the silicone pieces softer. If you’re making something like a pregnant tummy, for example, you want the prosthetic to stay quite firm and hold its shape. But if you’re working on any pieces that need more movement or flexibility you will need to mix in more Deadener to soften them.”
“We usually encapsulate silicone pieces in cap plastic to get a more seamless blend with skin.”
“The mould is sprayed with a type of wax, then the cap plastic is sprayed on both parts of the mould then the mixed silicone is poured in.”
“Then the mould is tightened together with either a clamp or bolts and left to set. Silicone has a curing time; so you have to mix it thoroughly and pour as soon as you can.”
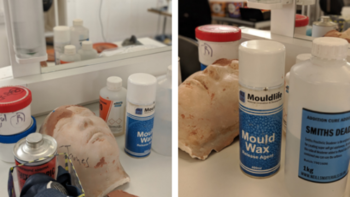
Left: Pots of PlatSil Gel, Right: Mould Wax Release Agent spray and Smiths Deadener
Step Three: Application
Once you have your prosthetic piece, it can be applied to the actor. And to do that, MUAs use medical grade adhesive.
Renata explains: “I’d usually have a few types of glue in my toolkit, the reason being some people can be allergic to the products in them, so it’s always good to have a backup.”
“One is Pros-Aide glue, and another is Telesis adhesive. They’re both very flexible and stay put for long periods of time which is what you need for long filming days.”
“The sticking process depends on the piece itself, but I’ll have sponges and cotton buds to help lay the pieces on actors’ skin.”
Step Four: Detail
To add detail, Renata keeps a selection of brushes in her toolkit.
“I’ll use a super fine brush to add intricate details and I have loads of old brushes where the hair has splayed out which are really handy for colouring up silicone prosthetic pieces. You don’t want the colour to be solid, it’s all about mottling, so old brushes are good for that.”
“I also keep a fibreglass brush which I’ve cut the bristles down to about a centimetre and I use that for flicking colour on.”
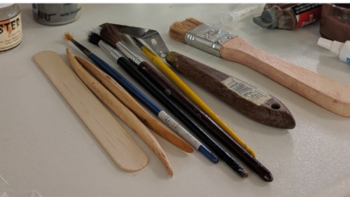
Brushes used for colouring, plus sculpting tools
Step Five: Removal
Knowing how to safely take prosthetic makeup off is just as important sculpting and applying.
Renata explains: “It can take a good 30-minutes to remove prosthetics. You can’t just tear it off as that will damage the actor’s skin, so you have to be quite careful.”
“I like to have a clean flannel on hand which I’ll pop in the microwave to warm it up and place it on-top of the makeup. This helps the skin sweat a little underneath to loosen up any pieces.”
“Then, similar to the glue, I’ll have a few products for removing the makeup, in case the actor has any allergies.”
“Telesis Super Solv helps to remove any adhesive on the skin or Pro-Clean cleansing oil is also good. I apply it and work away at the edges until the piece comes off.”
Prosthetics makeup is a highly complex discipline and we’ve covered just some of the basic processes and tools used in the industry. If you want to learn more about our course brought to you by Gorton Studios, take a look at our Further Prosthetics course page or get in touch.